It’s the time of the year! Christmas!

Just in a few more days it will be the long awaited Christmas!! It’s a day filled with sharing, joy and love.. And what’s Christmas without a Christmas tree!

The problem is I have a very small house with 5 people living in it. The thing about Christmas is that it doesn’t last longer than 12 days. Fine, okay, I can put it up a month before that. But you know what I mean. The tree will be kept in storage possibly 11 months of the year. There is absolutely no space at all for that.

But that gives me the chance to explore the crazy ideas that are on the net to make Christmas trees that are collapsible, or ‘perishable’. I’ve been making Christmas trees for my home for 5 years (I think). And most of the time I really just used magazines or mahjong paper to make the cone shape, then jazz it up with ornaments and lights. (You can take a look at my past trees here: Upsized quilling tree , Upsized Origami tree, Magazine loop tree, 2D wall deco and 4-tiered paper tree. Sorry tutorials not included =/). And after that, boom, it goes down the trash chute.

I was browsing on Pinterest to look at things I can try out, and I came across this pin , with 38 different ideas to try out. I love the last one. EXTREMELY. It’s a floating tree of ornaments! I went to the tutorial created by Megan, and she had the full tutorial on her page! Please do visit her site if mine is not detailed enough.

I followed it as closely as possible, but I did make some changes to mine because I couldn’t get the exact same materials she used.

So here’s my version of it:

Supplies:

  • 2 pieces of 30 x 50 cm BBQ wire mesh
  • Rope – 2.5 m
  • Bobby pin (optional)
  • 4 metal chains – 41 cm
  • 4 jump rings – 4 mm
  • 4 jump rings – 7 mm
  • Card binder ring
  • Wall hook
  • Mahjong Paper (Optional)
  • 100 triangular paper clips – 25 mm
  • 100 ornaments (58 pink ornaments; 42 silver ornaments)
  • Nylon thread or jewelry thread – 150 m

Most of the items are available in Daiso or Popular bookstores! I spent a total of $36 on the supplies. But that excludes the items that I already have at home. Jump rings and metal chains will be cheaper if you bought them from neighbourhood craft stores if not, then Spotlight is the only other place I know.

How to:

I couldn’t find a wire rack that was big enough for my mobile, so I bought two BBQ wire mesh. I overlaid them to make a square of 50 cm X 50 cm and used rope (that I found around the house) to tie them together tightly. I used a bobby pin to act as a ‘needle’ to allow me to maneuver the rope over and under the mesh easily. First, wrap the rope around the two meshes, and tie a dead knot. Then it’s kinda like sewing, put the bobby pin from under, bring the rope over the wire mesh and insert it through the wire mesh hole. There should be a loop on the underside of the wire mesh. Put the bobby pin through the loop and pull the rope tight (as shown in the pictures below). Keep going around the sides of the parts where the two wire meshes overlap. I also tried to hide the loose ends by wrapping my knots over them. It makes it tighter and neater. This part can be skipped entirely if you have a big enough wire mesh for your tree, or you just want to make a smaller version!

20151121_115401

20151121_123403 20151121_123416 20151121_123437 20151121_123446 20151121_123501 20151121_123516 20151121_123527

I then found these metals chains in my box of jewelry ‘what-nots’ and some jump rings to attach onto the rack. I cut 4 metal chains to 41 cm and attached jump rings on both ends of each chain (i.e. one end, the 4 mm jump ring and the other, 7 mm jump ring).

20151121_14115920151121_14135020151121_14291320151121_143528

I attached the chains to the four corners of the wire rack with the 4 mm jump rings. And to the other end of the chains- the 7 mm jump rings-  I hooked them together with a card binder ring and hung it on a wall hook.

20151121_143429 20151129_124053

I cut out a circle with a radius of 24 cm, from a piece of mahjong paper, and used it as a guide for the position of the hooks. I drew out 6- tiers, 4 cm apart (i.e. circles that were in the following sizes: radius 4 cm, 8 cm, 12 cm, 16 cm, 20 cm, 24 cm) and marked out the points where the hooks should go. I followed closely to the guide that Megan had put on her webpage. Her ornament tree was all green, but I wanted to make mine a mixture of pink and silver, so I also noted the colours and the length that the ornament should be and the point marked.

Christmas Tree Ornament MobileImage adapted from: not martha

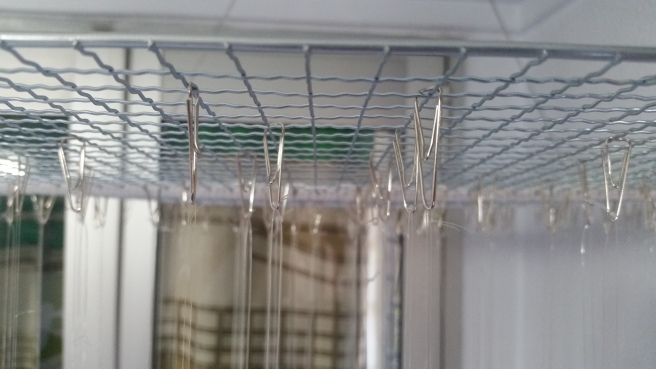
Megan used lanyard hooks in her creation, but I couldn’t find any. So I improvised and used paper clips instead. I bought the smallest paper clips I can find at Popular bookstore and they are 25 mm in size. I also made sure I bought silver triangular ones because I think the pointed tip at the end would be useful for the threads to stay in place and it looks neater to me as well. I stuck the guide I had on the top of the wire mesh, and hooked all the paper clips in place.

20151128_13332020151128_133214

Now comes the fun (but tricky) part. Although I wrote the lengths on the guide that I had, I realised the lengths were not suppose to just go in increasing order. Megan’s site didn’t mention how she arranged the ornaments, so I had to try a few different ways to see what works. I also alternated the colours to have a good mixture of both silver and pink ornaments. In the end, I decided to go in the order:

  • Centre point (1) : 14 cm
  • Tier 1 (7): 18.5 cm, 23 cm, 27 cm, 38 cm, 27 cm, 38 cm, 38 cm
  • Tier 2 (11): 36 cm, 40.5 cm, 45 cm, 49.5 cm, 36 cm, 40.5 cm, 45 cm, 49.5 cm, 45 cm, 49.5 cm, 49.5 cm
  • Tier 3 (15): 54 cm, 58.5 cm, 63 cm, 67.5 cm, 54 cm, 58.5 cm, 63 cm, 67.5 cm, 54 cm, 58.5 cm, 63 cm, 67.5 cm, 63 cm, 67.5 cm,  67.5 cm
  • Tier 4 (18): 72 cm, 76 cm, 80.5 cm, 85 cm, 72 cm, 76 cm, 80.5 cm, 85 cm, 72 cm, 76 cm, 80.5 cm, 85 cm, 72 cm, 76 cm, 80.5 cm, 85 cm, 80.5 cm, 85 cm
  • Tier 5 (22): 89.5 cm, 94 cm, 98.5 cm, 103 cm, 89.5 cm, 94 cm, 98.5 cm, 103 cm, 89.5 cm, 94 cm, 98.5 cm, 103 cm, 89.5 cm, 94 cm, 98.5 cm, 103 cm, 89.5 cm, 94 cm, 98.5 cm, 103 cm, 98.5 cm, 103 cm
  • Tier 6 (26): 107 cm, 112 cm, 116 cm, 112 cm, 107 cm, 112 cm, 116 cm, 107 cm, 112 cm, 116 cm, 112 cm, 116 cm, 107 cm, 112 cm, 116 cm, 116 cm, 112 cm, 107 cm, 116 cm, 116 cm, 112 cm, 116 cm, 107 cm, 116 cm, 112 cm, 116 cm

The last tier was a bit tricky and I didn’t follow the measurements on the website because after hanging it on, it looked incomplete. So I adjusted the length (as stated above) accordingly to make it look visually nice and rounded off at the bottom . I also multiplied the above measurements by 2 when measuring the nylon thread because I made a loop to tie the ornament.

I would suggest to start from the shortest length so that you will be working your way outwards. Hang them as you cut and tie the threads. The threads tangle up easily so it is easier for the ornaments to go up as and when they are ready!

20151129_124030

And this is how it looks at the end!20151129_12442420151129_124154

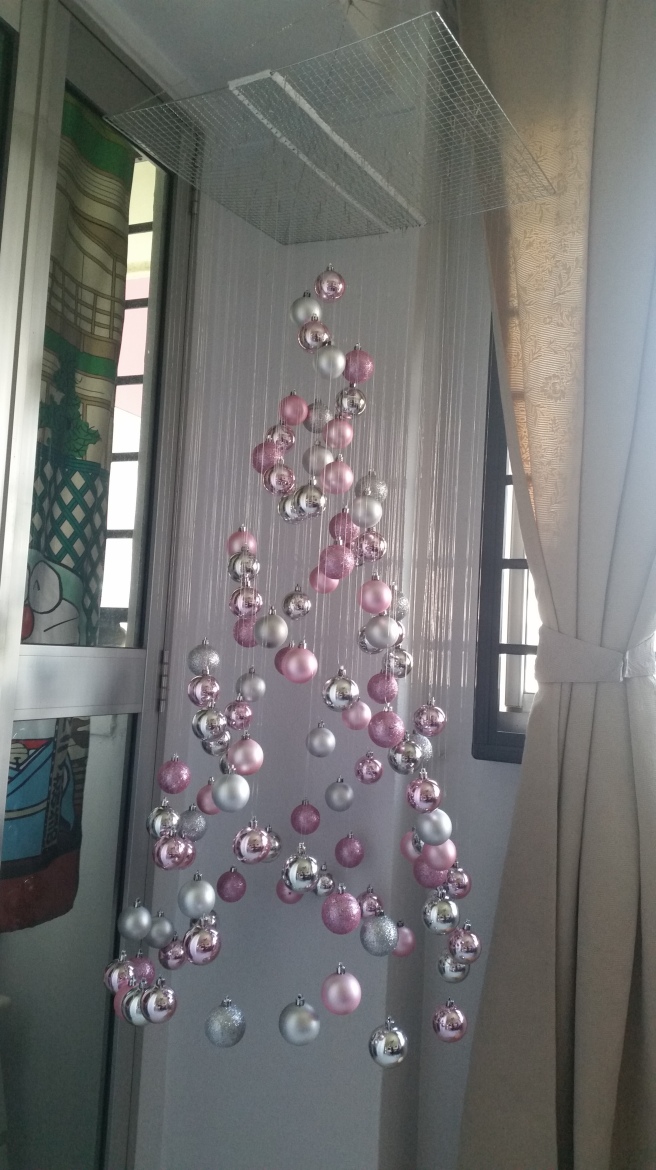
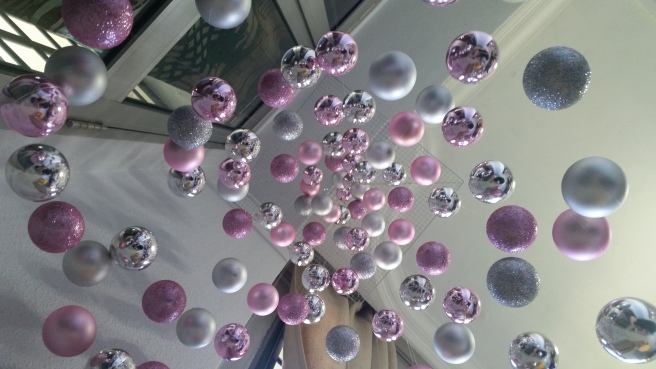
I’m planning to put presents on the floor, at the bottom of the tree and maybe some lights to jazz it up a little! So satisfied with how it turned out! 🙂

Bunch of cards!

Hello! I haven’t been hardworking lately. Or maybe I have been… I’ve made a couple more cards for a bunch of lovables but I didn’t have the time to take proper photos for tutorials. I haven’t got any recording device to record them down either. But these techniques are actually all online! I’m really, just using these ideas from pages on the net to my advantage, tweaking it a little to suite my theme.. Please pardon me for not acknowledging them.. I didn’t take note of where I got the image ideas from or where I saw a tutorial on the card. All of these cards are unique and are gifts, not made for sale!

Here goes:

Card 1: FC Barcelona quilled flip card

So I wanted to make a simple but yet thoughtful card for a friend that I’ve known all my life. I made a flip card with a quilled logo of FCB, his favorite soccer team. I guess I’m not such a qualified friend because after knowing him for all these years, this is the first card that I have given him. =X

PhotoGrid_1424067812603[1]

Cards 2: Chip n dale explosion box

My beloved sister was graduating and I wanted to do something special for her. On top of sewing some graduation gowns and mortar board for a pair of chip n dale plushies, I made this super cute and huge, explosion box. The outside is covered by chip and dale, with the iconic strips of the chipmunks. On the inside, I covered it with glistening beige coloured paper stamped with red, orange and brown acorns to give it a spring feel. And what better stamp to use than the acorn for chip and dale.

On top of that, I had several panels of small little craft. I made a quilling of chip n dale on one panel and I found a site online that provided print-outs of chip n dale paper figurine (sorry i lost the link!). I used some paper clay and wooden chopsticks to make two poles, and tied a thread across the diagonals of two panels. Cut little triangles of coloured paper and wrote alphabets to spell out Happy Graduation.

On another panel, I used a mixture of bamboo tiles (recycled from those bamboo seat covers) and coloured paper to write a message. It was also to add weight to the panel so that it will fall with an ‘explosion’ effect when it opened.

I also made 10 different customised instax frame stickers that were also chip n dale themed. I measured the dimensions of a typical instax film, and used very simple softwares such as powerpoint and paint (yes, judge me for using paint, but so long as it gets work done XD) to make these instax frame stickers. I then printed them on sticky labels that I got from a local stationery store, use a penknife to cut them out. On the graduation day itself, I used my polaroid camera to take photos of her and her friends.. and framed all the instax with these stickers!!

On the main portion of the box, I had layers of card that flipped outwards.. These were flip pages that had sleeves for instax films. I made those sleeves out of gift bags that I got from Daiso. The kind of gift bags that didn’t have gussets at the bottom, and the size was just perfect for my films. I further decorated that pages with printed images on the remaining of the sticky labels from the frame stickers. It was difficult to find stickers of chip and dale, so I decided to just print them. Although any other stickers would have made my life easier..

This took me.. probably 2 months to complete? But my sister only graduates once, and it was worth all my time 🙂

chipndale explosion box

Card 3: Double slider – Farewell

Then, there came a time when a couple of my colleagues were leaving (along with my previous post of the minion shaker card). I didn’t know what they liked or what characters they liked.. so I made very general cards for them. I stumbled upon the double slider card, and made this farewell card. Only variation of this is a slit for the plane to slide when the card is pulled. I admit, I spent a long time figuring out how to put this all together. This card was actually a lot nicer in my head, but I didn’t have time to redo it anyway. He loved it very much even though I thought I could do better. I used an unwanted map as the backing and cut out some clouds from white felt. Then cut out very kiddy looking letters to spell farewell. Made two writing panels on the slide out portions for all my colleagues to write a message to him.

PhotoGrid_1441200924488[1]

Card 4: Infinity Card – You’ll be mist!

Another farewell card was for a guy in another group. Though we’re not from the same department, he was very helpful and he was a great friend. I made an infinity card for him and decorated the pages with patterned and coloured paper. I love the last part (which is also an idea I ripped from another website, again, sorry, I didn’t save the link). Because I am a biologist, we use the spray bottle for alcohol a lot, to disinfect surfaces and tools. So that was a great connection. The spray bottle alone looked really empty, so I decided to use the old school decoration method. I don’t know if there is a name to it, but basically what you do is you first section the area into triangles or different sizes.. and then you start drawing lines from one point of the triangle, and fill up the whole triangle. The next triangle should then have the lines start off at points that are away from the previous starting point. And you just keep going until you finish them up. Everyone was pleased to see this card, and I admit, I love the infinity card myself. Whoever that thought of it is a genius! Go ahead and google “infinity card”. It’s not that difficult, and decorate your card away!!!!

PhotoGrid_1444551514204[1]

Card 5: Double slider – Doggy house

Birthday season then came. From September till the end of the year, I have to spend lots of money for presents and lots of time for cards. Most of the people I know and love have birthdays at the end of the year.

I revisited the double slider card because I think it is the perfect card when it is from two people. We’ll just take a panel each! And we did. This card was mostly coloured in with water colour pencils, markers and ink pads. She is an animal lover and she has so much passion that she became a vet! So it was easy to pick a design for her. I googled for images (I can copy, I can’t draw from scratch >.<) and this cartoon dog was too cute for me to not draw it! I added the balloons to make it more suitable for birthday, lined the pull tab with a washi-tape and topped it up with a red ribbon secured with a fastener.

IMG-20151101-WA0002[1]

Card 6: Magic Slider Card – Birthday Cake

And last of the list. I came across this card that I cannot stop myself from making. It is SO COOL. It’s called the magic slider card. You know how magicians first show you a colouring book that is empty, and then “Abracadabra” the pages are filled in? This is somewhat the same, except you become the magician! Again, lots of tutorials are out there for a magic slider card. My variation was to draw the image instead of stamping it because I can’t bear to spend money on stamps and ink pads! Stamps would make your work a lot easier but permanent markers would work perfectly too. Many tutorials mention to use acetate.. Honestly, I have no idea what that is, and as you can already tell, I’m really lazy to find out what it is. So I just found a clear plastic that was lying around somewhere in my box of scraps, put it over my birthday cake image that I drew and filled in with pattern paper, and traced it out. It was just that simple! I just decorated the rest of the card with some ribbons and cartoon animals (that I copied off some website again =X) and voila, it’s magic!

PhotoGrid_1447557927925[1]

I really hope I have the patience to take proper photos or videos to make tutorials the next time. But once you start the crafting gear, you know there’s no stopping to it. I will try my best the next time, but no promises!

Minion Confetti – Shaker Card

A colleague of mine is leaving my workplace to pursue something more suitable for her, and I only got to know recently that she has three more days left with us!! So I had to quickly think of something special, yet simple to make, to be just in time before she leaves!

Every time I want to make a card, the very first thing I have to decide is the theme. And this card was easy because she is a huge Minion fan. So I started browsing online for ideas and didn’t chance upon anything that I thought was special enough to make. And then it hit me! Minions, many many minions. Minion confetti!!! What better way to house these minions – Shaker card!

So here’s how I made it:

Get a yellow cardstock measuring 10.5 cm X 21 cm. Fold it in half. This will be your card base. Next, cut a piece of coloured paper 9.5 cm X 9.5 cm. This will be stuck on the inside of your card for you to write your message! Here I am using a glitter white construction paper that I bought of a local bookstore and used a cute banana chop to stamp the whole piece because minions loveeeeee bananas!!

20150726_23482520150726_234720_edited

Apply adhesive tape on the back of the white sheet and stick it on the inner side of the card. Here in the photo, I’ve simply lay it over my card for the photo. Do arrange it so that it is in the middle!

20150727_173332Now to make minion confetti! First I used a typical hole puncher to punch several yellow and blue circles. The number of circles depends on each person’s liking, but I think I made close to 50 circles. The number of yellow and blue should be equal.20150726_210259 Leave the yellow circles aside. Cut the blue circles in half. These will form the uniform of the little minions.20150726_210843

Apply adhesive on the back of two blue semi-circles and stick them to the lower part of the yellow circle (as shown in the picture). Do this for all your tiny yellow circles! Next, you have to draw the details to make them look like the minions. I used a grey marker to make the rim of the goggles that the minions wear. You can use a silver marker or pen to make it look more metallic! Also, vary between one and two eyes to give a good mixture of the type of minions you have!

20150726_211302            20150726_22272620150726_223605

Fill in the eye balls of the minions with a white pen. You can use correction fluid if you don’t have a white pen, but it will be a lot more difficult to control the flow. Then fill in the details of the minions with a fine tip black pen! You can vary the position of the eyeballs and mouth to give them different expressions! Draw a thick line across from the goggles for the band around their heads and draw a small semi-circle on the bottom blue portion for the pockets on their uniforms! Do this for both front and back sides.

20150726_224424 20150726_231645Now for the window of the card. I chose the same glitter white construction paper (measuring 9.5 cm X 9.5 cm) and used a cute little tool that I bought from Daiso that does dry embossing. This tool basically makes indents on the piece of paper. I picked the star shape and dry embossed the piece of paper.

To give it dimension, I cut out a piece of foam (also measuring 9.5 cm X 9.5 cm). In the middle of the foam, I cut out a circle with a radius of 3.5 cm. I then lay the foam over the embossed white sheet and used a thick black marker to write “Poopaye”  – which means “Goodbye” in minion language – in the middle of the circle. I then applied adhesive tape on the under side of the foam and attached it on top of the white sheet.

20150727_160458

Now is the time to add the tiny minions in! Pour your minions into the circle. You can add sequins or other decorative bits at this part to make it sparkle! But be careful not to add too many so that you can still see the message behind! Cut out a piece of clear plastic (measuring, again, 9.5 cm X 9.5 cm) and stick it on top of the foam attachment. After which, I picked a piece of patterned paper, also 9.5 cm X 9.5 cm, and cut out a circle with a radius of 3.5 cm just like how I did for the foam portion. Apply adhesive on the underside of the paper and stick it over the plastic.
20150727_162047Lastly, I made borders to hide the edges and give it a cleaner look. The square border was made by cutting out a square of 10 cm X 10 cm. From that piece, measure 0.5 cm from the edges and mark out a square in the middle of it. This should give you a smaller square in the middle that measures 9.5 cm X 9.5 cm. Cut this square out and you will get the border. Using a white pen, I drew short dotted lines spaced out equally to give it a stitched feel. The same goes with the circle border. Cut a circle of radius 3.8 cm and a smaller circle in the middle of it with a radius of 3.4 cm. Draw short dotted lines on the circle border, apply adhesive and line it on top of the window to hide any unsightly rims of the underneath layers.

20150727_164500Now to attach this cute window onto your card. Apply adhesive on the back side of the window and align it at the centre of your card stock! And you’re done!20150727_181606-1Aren’t they cute? You can edit this card to make it a birthday card or any other card for a minion fan. Simply change the word on the inside of the window to make other variations of this card!

20150727_181622

Hope this tutorial is helpful! I figured my photos are a bit lacking because I’m always so hyped up to finish up my craft and forget all about taking photos for each step! Also, I don’t plan my cards in detail and get ideas along the way, so they always end up a little different than what I had in mind initially.  So please forgive me for the lack of photos! Do leave me a comment if you have any questions.

Something’s brewing

My very first post. So, a little bit about myself. I have been doing craft work ever since young. Making cards for my parents and friends, sewing clothes for my barbie dolls, tying friendship bands, making rubber name stamps.. etc etc. Never thought it would go this far. From small little things, I started becoming ambitious. I wanted to be able to do more than what I can already do. Always up for the challenge. Not very sure how I would gear this blog.. Towards tutorial based posts? Or just showcasing the final pieces. It depends, I guess. On how hardworking  (or lazy) I am to take photos while doing my thing.

I decided to start this blog as a space to pen my ideas and hopefully, share my craft pieces with people of the same interest as me. I admit I’m not the best in what I do. There are tons of people out there who are more skilled and talented than I am. But flip a coin, the probability that it lands on either side, is 50%. There are also tons of people out there who can’t do what I do. This makes me feel satisfied when I’m done with a piece. And that makes my hunger for satisfaction grow.

What led me to this is this current project I’m planning. It’s a huge ass project (at least to me, it is). And I think it will take me at least half a year, if not, more, to complete this piece.

Here’s a sneak peak at what my plan is:IMG-20150706-WA0001

I bet some of you will be able to guess what’s brewing. But I’ll continue to keep it a suspense until I’m done with it.

On the side line, couple of projects that are on the go. I haven’t been very hardworking and keeping photos of each step of my pieces. Will try to start doing that so you can do it too!

Please visit my pinterest for the pieces I’ve created in the past: https://www.pinterest.com/headquart3rs/

If you are interested to know more about any of the pieces, please do me leave me a comment and I will answer to the best of my ability!

Can’t wait to upload my very first tutorial! What’s it gonna be?